Initial configuration of the video scoreboard software
In sports, clarity and accuracy in the display of scoreboards is essential. With technology advancing by leaps and bounds, digital sports scoreboards have become an essential tool for any self-respecting sporting event. In this article, we will guide you through the essential steps to facilitate the initial setup of video scoreboard software and customize your own sports scoreboard using state-of-the-art technology. You will learn how to operate an LED display, set up a Windows 11 or Windows 10 PC, and use the LDSscoreboard software to create an unforgettable viewing experience for viewers. Get ready to transform your event with a scoreboard that not only displays the results, but also captures the excitement of the game.
You should take note of the actual resolution of your LED display in pixels, i.e. how many pixels it has horizontally and how many pixels it has vertically. We will use this information to generate the video output of the video marker software that fully matches the size of the LED display. For the example we are going to see imagine that you have a 800×600 LED screen.
The steps to follow to configure the video scoreboard using LDSscoreboard are as follows:
What do you need to have a video scoreboard?
The elements that we will need to configure and customize a sports scoreboard are:
Initial status of the video scoreboard configuration
Let’s start from the assumption that you already have an LED display, with its sender perfectly configured and operational. You can verify this by seeing that if you connect the HDMI from the sender to your PC and extend the desktop in the Windows display settings, you can see on the LED display a consistent output, with higher or better resolution but what looks like it looks correct. You can do a test by putting a background image and checking how it looks on your LED display.

You should take note of the actual resolution of your LED display in pixels, i.e. how many pixels it has horizontally and how many pixels it has vertically. We will use this information to generate the video output of the video marker software that fully matches the size of the LED display. For the example we are going to see imagine that you have a 800×600 LED screen.
The steps to follow to configure the video scoreboard using LDSscoreboard are as follows:
Install LDSscoreboard
The installation of LDSscoreboard consists of downloading the application from our download area, and unzipping the zip file in one of your directories. Once the decompression has been completed, the only thing left to do is to run the LDSscoreboard.exe file.
Configuring the LDSscoreboard Output
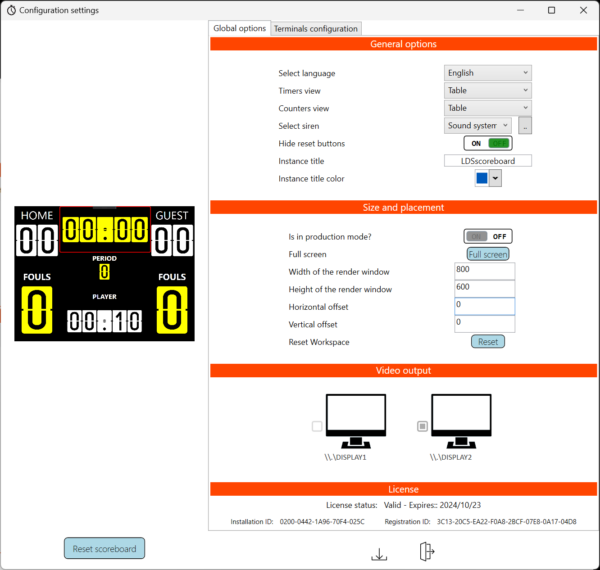
Once the LDSscoreboard application is started, open the configuration window and select the width and height of the rendering window. Leave the output device as it is, we will configure it later.

Connect the sender to the HDMI output of your computer.
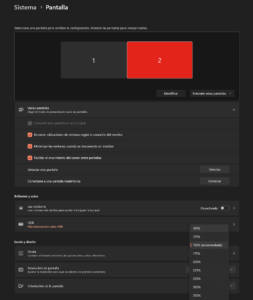
It’s time to connect your sender to your computer. To do this, using the HDMI cable, connect the sender to the free HDMI output of your computer and then configure, in the Windows display settings, the extension of your desktop. Pay special attention that the magnification factor is 100% on both screens, as we need to be able to adjust the video scoreboard content at the pixel level.

Select video output in LDSscoreboard
Now, in the LDSscoreboard configuration it is time to select the HDMI output where the scoreboard is connected.

From this point on we can use our LED screen as a video scoreboard.
The next step is to use one of the sample markers that come with LDSscoreboard and make some simple adaptations.
